autumn days
Showing posts with label recipes. Show all posts

Thursday, September 15, 2016

Kombucha Love

My good friend spontaneously handed me a jar of scoby for kombucha several years ago.  I had no idea what it was.  My body had been breaking out in hives for months from a "leaky gut".  I'd declined food sensitivity treatments because of their unjustifiable expense.  At home, after mixing and sampling my own kombucha, my hives entirely disappeared and have not returned.  Now I have one gallon of honey bush lavender green tea kombucha brewing and another jar crammed to the top with very happy extra scobies I share with anyone who expresses interest.  When cut into small pieces, chickens, cats, and dogs love the nutrient packed substance.  It is also nourishing for houseplants and gardens.  I somehow have kept all my scobies alive and provide new ones for my friends that cannot.

Kelsey Willard summarizes my love of the kombucha brew of champions well.  "Wanting to ward off those nasty lingering colds from this winter?  Maybe you are looking for an alternative to coffee &/or soft drinks?  Or maybe you are looking for a new choice of "juice" for your littles, instead of feeding them the pasteurized liquid sugar from the super market.  Whatever your reasonings may be, Kombucha deserves your attention and a try."


Our Simple Forgiving Delicious Kombucha Recipe
Materials
  • one gallon glass jar
  • green or black tea bags
  • non-stainless steal pot
  • glass bowl
  • one cup sugar
  • kombucha scoby
  • cloth
  • rubberband
Steps
  1. Pour out kombucha into glass containers, store in refrigerator.
  2. Leave scoby mother and a quart of juice in your gallon glass jar.
  3. Boil a gallon of water in pot (use no stainless steel with kombucha).
  4. Turn off stove.
  5. Pour half the hot water into a glass bowl and stir in 1 cup sugar.
  6. Place 5-6 green or black tea bags in pot (the one without sugar), add any tea flavoring you like, and let the tea steep 45 minutes.  (I use decaf green tea.)
  7. When cool enough, pour both liquids into scoby jar, leaving 1" space at top.
  8. Cover with cloth and secure with a rubber band.
  9. Let it all brew until you like the flavor, then repeat the recipe.  Time varies by temperature, size and number of scobies, and personal preference.
Kombucha love

Friday, July 31, 2015

Dandelion Love

We really love dandelions.  We use them to make smoothies, cookies, sauteed greens, and bouquets for neighbors.  Dandelion-infused oil is good for the skin.  The dried root makes a great tea for digestion.  Dandelions grow best for us in the spring, when this photo was taken.  The fresh spring greens are packed with vitamin C.  The benefits of these dandy flowers are vast.  Join us in our Dandy Love Fest!


Sunday, November 23, 2014

Togetherness of Plum Jam

I love my friends.  I love the connections and joys of friendship.  I love helping a friend out by putting their abundant fruits to use.  My friend Pamela was unsure of what to do with the extra thousand pounds of fruit on her trees, so I called in my other friends to clean them up and spread the abundance among other friends.  I love the simple beauty in synchronizing an exchange between those with too much fruit and those who would like more fruit.  Now we have simple, beautiful plum jam.  Pears are waiting to ripen a bit more.  Apples are whispering to me about jelly.

Over a decade ago, a good friend taught me how to make jam.  Each year I try at least one new recipe.  I have canned berry jams, salsa, pickled watermelon rind, tomato sauce and paste with seasonings, pitted plums, sliced pears, apple sauce, and others I don't recall.  My specialty has been berry jams.  I love tossing berries into the blender, boiling the sweet pectin berry concoction, and moving easily from start to finish.  Adding lemon or lavender creates a twist of flavor.  I love simple.  I love simple with a twist.

My personal recipe:
  • Follow the directions on various pectin recipes.
  • Make it once by the recipe, and then EXPERIMENT!
  • Substitute honey for sugar.
  • Reduce sweetener.
  • Add in other flavors found in your herb cabinet: chamomile, lavender, etc.
  • Use whole pureed fruit (whole food) in place of juice for jellies.
  • When in doubt, puree it.
I love this season of fruit-filled abundance.  I love my daughter joining me to prepare fruits and jars.  I love the possibilities that await with our remaining fruits.  I love helping friends unload their unused delights by sharing them with others.  And then turning what remains into gifts for others.  Everyone wins in every way.  Simple, beautiful, deliciousness.

What are some of your favorite preserving projects and shortcuts?

Saturday, November 22, 2014

Holly's Dishwasher Detergent

Holly's Dishwasher Detergent recipe:

-3 cups borax
-3 cups washing soda
-1 ½ cup citric acid
-1 ½ cup kosher salt

Mix together.
Store in tightly-sealed container (not glass).  
Shake periodically because it likes to clump.

Holly's Simple Powdered Laundry Soap

Holly's Simple Powdered Laundry Soap recipe:

2 cups of finely grated Castile soap
1 cup Borax
1cup washing soda
1 cup baking soda

Takes 5 minutes to assemble.  Mix all ingredients in a food processor.  Makes 6 cups of detergent.  Use 1 to 2 Tablespoons depending on size and severity of soiled items in load.  Stir clumps and shake before use.  About 40 loads.  Stores easily.

Simple Tie Dyeing

This week we tie dyed shirts with friends.  I was surprised by the simplicity of this process.  We already have everything at home to recreate the process.  Here are the steps.

Place small cups inside the shirt and rubber band around the edges to keep cups in place.
Color on the banded cup circles with permanent Sharpie pens.
Lightly cover coloring with rubbing alcohol.
Dry in the dryer, wash in cold water, and then they are ready to wear.

Saturday, November 1, 2014

Homemade Bread In A Bag

Last week we crafted bread with fantastic friends.  As a visual learner, I love seeing someone else craft something before recreating it.  Here is the simple bread recipe we followed with friends.

Bread In A Bag
  1. Add ingredients into a gallon-size bag: One cup wheat flour, half cup warm water, 1 Tablespoon salt, 1 Tablespoon yeast.
  2. Zip the top of the bag.
  3. Mash it up for three minutes.
  4. Sprinkle in some flour till not so sticky.
  5. Let rise 30 minutes.
  6. Add more flour, any crushed nuts or desired dry flavorings, and mix.
  7. Spread on parchment.
  8. Roll into a ball.
  9. Slice the top.
  10. Bake 25 minutes or until lightly browned.


This recipe definitely needs a bit of tinkering, such as on bake times and flour quantities.  We had a great time mixing, baking, and devouring our loaves of bread.  We compared texture, flavor, and coloring.  The results of our science experiment were scrumptious.  The next day we made a batch of this bread and Challah bread with garbanzo and rice flours, resulting in dry dense loaves.  I continue to check out Bob's Red Mill Baking Book from the library, though I have yet to make the time to open it in search of an alternative grain bread.  (I use alternative grains for my family to eat a variety of grains, and I become itchy and tired after eating additives often found in gluten products.)

In the meantime, we've given new life to a friend's old bread machine.  My alternative rice flour sourdough starter and Bob's Red Mill wheat flour together make a scrumptiously sour loaf.  My children choose nuts and fruits to add mid-cycle.  It's great fun to experiment with breads.

What is your favorite bread recipe?
What culinary crafts does your family adore?

Mixing the bread in bags

Letting dough rise outside in the sun

All that was left when I paused in my consumption to snap a photo

Thursday, July 3, 2014

Anna's Super Awesome Long-Lasting Play Dough

Our dear friend Anna gave us an awesome play dough recipe we'd like to share.  We simply love it. 

  1. Mix 2 cups of flour, 1/2 cup of salt, and 2 Tablespoons cream of tartar.  
  2. In a large measuring cup add any scent, spice, or color you like.
  3. To this add up to 2 cups boiling water.
  4. Add 2 Tablespoons oil and 1 1/2 cups of the water.
  5. Mix and add more water if you need.
  6. As it cools, turn on to the counter and knead.
  7. If it starts to dry out you can add a little oil to it.

Dandy Sautéed Greens

For our herbal remedies class, Hannah and her friends sautéed up their own dandelion greens.  The greens were so scrumptious there was not a crumb remaining.  This is a simple recipe, especially after you've done it once or twice, though you can eat these greens any way you like.  Add a little more spice, a little sweet, savory, make it just your style.  You can even put the new leaves in your salads for a vitamin boost.  How do you like to eat your dandy greens?

Sautéed Dandelion Greens

Yield: Serves 4
Prep Time: 10 mins
Cook Time: 10 mins
These bitter greens mellow out when sautéed with garlic and seasonings.

Ingredients:

1 Large Bunch Dandelion Greens
4 Tablespoons Olive Oil
Salt & Pepper
Dash Of Red Pepper Flakes
1 Large Clove of Garlic, Chopped
1 Tablespoon Vinegar

Directions:

Rinse the greens well, and remove any brown ends.
Squeeze dry to remove excess water.
Cut into 3 inch pieces. In a large, heavy saucepan or frying pan, add the damp greens, the garlic clove, vinegar, and the oil.
Sauté for 8 to 10 minutes, or until the greens are soft and tender.
Add salt and pepper, and red pepper until you have reached your desired level of heat.
Place on a platter, and serve.

Dandelion Cookies

We had so much fun harvesting dandelions and baking them into cookies.  (Here's one recipe, though we love the one from learningherbs.com.)  Dandelions are so delicious, and so healthy.  They help with many skin issues, digestive challenges, sore muscles (as a topical oil), and there are so many tasty ways to eat them!  Sauté the greens, fritters, fruit shakes, and cookies.  When we sautéed the greens in our herb class, every student devoured them completely.  Our friends raved about the cookies.  Simple, healthy, fun.  What a treat!


Saturday, October 26, 2013

Herbs & Hyssop Oxymel

We have so many dried herbs just waiting to be put to use.  Our little kitchen apothecary is bursting with rosemary, sage, chamomile, mint, raspberry leaves, rosehips, lavender, and calendula.  I make teas and scented rice heating packs, but what else is there?  Rosemary Gladstar's Herbal Recipes for Vibrant Health is our starting point for making the most of our herbs with tinctures, salves, and more.  

Here is a simple Hyssop Oxymel recipe we received from Learningherbs.com.  We planted hyssop for the bumble bees and now we will put it to use as an herb for colds, flu, fever, bronchitis and more.

Ingredients:
  • Hyssop (fresh or dried) Buy dried hyssop here
  • Good quality honey
  • Apple cider vinegar
  • Jar with a plastic lid                                                   
Steps:

  1. To make your hyssop oxymel, fill a jar lightly with chopped fresh hyssop herb. (If using dried hyssop just fill the jar half way.)
  2. Next fill the jar about 1/3 of the way full with honey. (For a sweeter and thicker preparation try filling the jar half full with honey.)
  3. Then fill the jar the rest of the way with the vinegar.
  4. Vinegar can corrode a metal lid, so you’ll need to cover it with a plastic lid, or place a barrier between the metal lid and the liquid.
  5. Place a label on it and let it sit for 2-4 weeks.
  6. Strain it well.
  7. Oxymels will keep for a long time. You can keep this in the fridge for longer preservation (I never do though and it lasts for the entire winter).

Saturday, June 9, 2012

homemade chalk

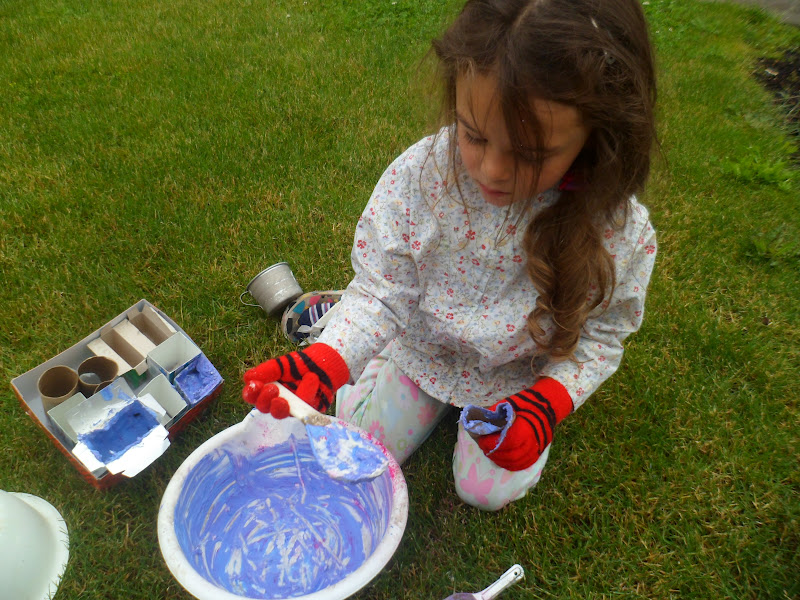
A teacher friend gave us some old powdered tempera paints and told us we could make chalk.  Months later we have finally found a simple recipe and assembled all the ingredients.  A little box of plaster of Paris cost us $7 at Home Depot, so I don't know how cost effective this all is, though we are making use of our paints and learning how to make something for ourselves that we'd otherwise buy, usually made far away and shipped to us.  If this works, we will be able to supply ourselves with brilliant chalk, but also to gift it to our friends.

Directions:
  1. Mix 1.5 cups plaster of Paris in a disposable bowl (we use our cement mixing containers).
  2. Slowly add 3/4 cup of water.
  3. Add 2-3 tablespoons of tempera paint.
  4. Pour it into your molds (such as toilet paper tube with end sealed with strong tape).
  5. Let it dry.
  6. Use as awesome homemade chalk!
This is what happened.

Our ingredients list: containers with taped bottoms, plaster of Paris, tempera paint, water

adding and stirring (the water)


trying to make Hannah's favorite color (violet) with lots of powdered tempera paint

scraping the bowl clean after our first batch
Well, this was a great project to try together.  We made three batches and have enough plaster for a fourth.  Our first batch was as hard as a rock, though it works a bit after soaking in water.  The second batch was stirred too slowly and came out in fragile little pellets.  And our third batch works just right.  All the chalks came out in beautiful colors, though they all draw in white.  We will put together our fourth and final batch soon, this time adding more tempera paint, leaving Liam on my back in a carrier the entire time, and I will be the one to mix and stir quickly.  Once our plaster is used, I doubt we'll be making chalk again this year.  The kids loved making this at home and sharing it with neighbors.  Perhaps someday we will find a book involving chalk and throw a book club party with this project.

Have you made chalk?  Do you have any pointers for us?

Wednesday, March 7, 2012

homemade saline solution

My 16-month-old son Liam has been sick with another cold while he cuts four new molars at the same time.  Poor guy.  We find a children's saline solution in the nose so helpful to dry up mucous and congestion.  Hannah used to squirt it into her own nose when she was sick, but this guy doesn't like it one bit.  He breathes and sleeps so much better after a little dose.  When we recently ran out, I found this simple recipe for homemade solution and put it into our old saline bottle.  For adults, I have heard rave reviews about daily washes with the neti pot, though I am sure this saline solution would also work.

Homemade Saline Solution for Children:
Boil one cup water and one teaspoon salt in a pan for 10 minutes.
Cool it and then put into a dropper or small dispenser.
Put a few drops into child's nose while they lay on their back, then suction out mucous.

Saturday, September 10, 2011

no poo shampoo

I heard about No Poo Shampoo a couple months ago from a friend.  And then I heard about it again and again.  I finally found a simple and helpful recipe online for shampoo and conditioner recipes.  Easy.  Clean.  After trying my first home recipes, my hair was mostly happy but quickly drying out.  This recipe keeps my hair happy and soft.  And concocting these recipes in my own kitchen saves so much global energy and waste.

Shampoo:
one tablespoon baking soda per one cup water in a pour bottle, shake before use

Conditioner:
one tablespoon apple cider vinegar per one cup water, shake before use, less vinegar if hair too oily


10/2011 Update: I love this easier cleaner recipe!  I use a little more than one cup of shampoo and conditioner each time I wash my hair.  After swimming days, I soften it all up with a touch of store-purchased conditioner.  My daughter and I love the easy washing and our hair is doing great!

Wednesday, July 13, 2011

homemade liquid laundry detergent

This liquid laundry detergent is simple and can reuse the same laundry detergent container repeatedly, as opposed to purchasing more plastic that has been shipped hundreds of miles.  I love this recipe and use the same amount of soap as with the store-bought soaps, though it needs a good shake before each use.  


Recipe and directions from simplyresourceful:
1 cup hot tap water
1.5 oz grated bar soap
1/4 cup Arm & Hammer Super Washing Soda
2 T 20 Mule Team Borax
essential oils (optional)

Add soap flakes to saucepan with water.  Stir over med-low heat until melted.  Fill a 1 gallon jug half full with hot tap water.  Add melted soap, washing soda, and borax.  Stir well until all powder is dissolved.  Fill bucket to top with more hot water.  Stir, cover, and let sit overnight to thicken.  Shake before each use.  Optionally, add a few drops of essential oil.  Use 1 oz. per load in a front-loading washing machine.

Monday, May 23, 2011

homemade beeswax lip balm

My friend Holly and I undertook the challenge of making our own lip balm.  You may ask, like a friend of ours did, "Why?!"  Well, we do love a challenge, making household goods, and using basic ingredients to make products we would otherwise buy in plastic packaging produced in far away places.  We love making gifts for our friends and trying these new projects with our children.  

For lip balm, we thought of giving friends bee-themed baskets, such as beeswax lip balm, local honey, and beeswax candles.  First, we collected the ingredients and containers for making our own lip balm.  Holly rendered her own beeswax from last year's hives, along with making her own vanilla from rum.  She purchases a gallon of coconut oil at a time, as she uses it for many home-assembled goods.  Her honey came from Zenger Farms, where she knows it is locally and sustainably produced.  We were ready to put it all together once we'd gathered supplies and children. 

Recipe:
1 cup (225 g) shredded beeswax 
14 oz coconut oil
5 T (100 g) honey
5 T pure vanilla extract

Heat the wax in a saucepan over low heat to 150 degrees.  In a separate saucepan, heat the oil to the same temperature.  When both are heated to the proper temperature, add the coconut oil to the beeswax, remove the pan from heat, and stir steadily until well blended.  Then add the honey and the vanilla extract, and continue to stir until well blended.  Pour into tubes or tubs, allow to cool overnight, and then cap the containers and store at room temperature, out of direct sunlight.    **Fills 100, .15-ounce lip-balm tubes**
(This recipe wax taken from The Backyard Beekeeper by: Kim Flottum and then from simplyresourceful.blogspot.com)


half-ounce tins, rendered beeswax, and local honey
a math lesson in measuring by weight and volume

Hannah was especially helpful with opening and sorting all the balm tins.
We followed the directions, measuring things out by volume.  It turned out that the recipe's equivalent measurements (cups verses grams) were not truly equivalent.  When cutting the recipe in half, we needed two cups of shredded beeswax (as opposed to the half-cup suggested by the recipe) to get the 115 grams for our recipe.  We made this recipe a second time after finding the differences in equivalents during the first batch.  For both our batches, there was severe separation of the oil and water-based ingredients.

Some containers had a liquid (vanilla honey) mixture in the bottoms.

The honey and rum vanilla are quite delicious, but they make for a very messy lip balm.
Some of our lip balms came out with just the waxy top (wax and oil), though many of them have liquid trapped underneath or floating to the top.  I separated the successfully solid balms from the ones containing liquids.  The solids I am able to give to others, and I have made use of the separated tins for myself.  Hannah and I drained the liquid and will use it in later recipes as vanilla, as it is mostly vanilla and honey.  We melted the solids down again to make our own container of lip balm.  Hannah and I are enjoying our new lip balm and I feel good providing my child with a healthy homemade way to moisturize her lips.  This activity has provided her the opportunity to learn some chemistry while helping to make lip balm.  Someday, when we attempt more lip balm, she will have more of a hand in the assembly and we will surely use a different recipe.

Saturday, May 14, 2011

homemade toothpaste

My dad has used straight up baking soda to brush his teeth for years and it has worked well for him.  My friend tells me baking soda is hard on the gums.  Well, we tried another recipe for homemade toothpaste.  Why try another homemade thing I can simply buy at the local store?  Reason number one: I don't really know what chemicals are in the store toothpaste, if they contain sugars, and if they are safe for my family.  Reason number two: I ran out of toothpaste and didn't want to run to the store to attempt to make a healthy choice.  Reason number three: My friend Holly tried it and said it wasn't bad.  So, Hannah and I dove into another chemistry experiment and made our own toothpaste.

Recipe from Simply Resourceful:
almost 1/4 c. baking soda
almost 1/4 c. coconut oil
4+ drops of peppermint essential oil (more or less as needed)
about 1.5 Tablespoons of honey
1.5 teaspoons hydrogen peroxide


I made the recipe as above, except my inability to follow any recipe exactly made me attempt to solidify the paste by doubling the baking soda.  I also added a few tablespoons of peppermint extract instead of essential oils, as I used what was on hand and had not planned ahead.  With admitting these modifications, I feel like a haphazard chemist in the kitchen, but perhaps that is what I am.  As the mixture hardened, the coconut oil separated and rose to the top.  Hannah enjoyed adding ingredients, mixing up the layers, and now enjoys using her new baking soda toothpaste a few times a day.  She seems more interested in this paste and in brushing her teeth more often because of her ability to make her own toothpaste.  This homemade toothpaste has a pleasant flavor and keeps our teeth and gums feeling clean, though it doesn't have the flavor or foam of store-purchased toothpastes.  


*Updated 5/26/11: Our first batch lasted three weeks (we brush a lot) and we've made a second batch without coconut oil (the store was out when I attempted to buy it).  My love-the-foamy-minty-paste husband even tried it and was mildly impressed.  Hannah still loves brushing her teeth with her homemade toothpaste after meals.
the toothpaste mixture calling out for more baking soda

the premixed toothpaste mixture in a small canning jar

Sunday, March 27, 2011

Beeswax Lip Balm Recipe


Holly and I will be making beeswax lip balm with these ingredients.  We are currently assembling all our supplies to try to only buy the extras we need.  Holly is now extracting and processing her beeswax from her own hives.  Instead of buying materials, she is using what she and I have, such as used tights and old steel pans.  She's even made her own oh-so-delicious vanilla extract!  We are only purchasing one thing: 40 half-ounce lip balm tins from Ruhl Bee Supply.  There will be more to share on all of this soon!

Beeswax Lip Balm Recipe

1 cup shredded beeswax
14 oz. coconut oil
5 T honey
5 T pure vanilla extract

**Makes one-hundred, .15 ounce lip-balm tubes**

our lip balm tins: some new and some shared by friends

Sunday, February 20, 2011

homemade products (take two)


My friend Holly has excellent recipes and we are trying these new adventures together.  Here are several recipes she has generously shared with me.  She's also going to show me how to make my own castile soap soon.  I'd like my next venture to be creating my own beeswax chap stick.


SHAMPOO:
One quart water
Herbs
4 Ounces castile soap flakes

Bring the water to a boil.  Turn off the heat and pour over herbs.  Steep at least 20 minutes.  Strain herbs and pour tea over the soap flakes.  Stir until the soap flakes dissolve.  Once the mixture has cooled, store it in a plastic bottle.

***Different herbs can be used for different purposes (e.g. dry vs. oily; blond vs. dark; curly vs. straight).  For normal hair, common herbs are lavender, rosemary, red clover, & horsetail. I have a lot of different combinations depending on the hair you have.  Ask for specifics and I'll look it up.


02/2012 Update: This homemade shampoo dried my hair out a bit and it felt like it had a bit of build up.  I have been using a new simpler recipe for the past six months and my hair still feels great.


LAUNDRY DETERGENT:
1 cup hot tap water
1.5 oz. grated bar soap  
1/4 cup Arm & Hammer Super Washing Soda 
2 T Borax

Add soap flakes to saucepan with water.  Stir over med-low heat until melted.  Fill a 1 gallon jug half full with hot tap water.  Add melted soap, washing soda, and borax.  Stir well until all powder is dissolved.  Fill bucket to top with more hot water.  Stir, cover, and let sit overnight to thicken.  Shake before each use.  Optionally, add a few drops of essential oil.  Adapted from www.duggarfamily.com/recipes

(My personal note: I saw Holly's laundry soap and it looks just like the one I buy at the store.  If I load up my detergent container with this instead of purchasing more, my husband couldn't tell the difference!)


10/2011 Update: I found my friend's homemade castile soap had too much lye and was burning holes in clothes.  For now, I use store-bought castile soaps and let the laundry detergent and water mix well before adding clothing.


PIZZA SAUCE:
1 (6ounce) can tomato paste
6 ounces warm water
3 T Parmesan cheese
1 tsp. minced garlic
2 T honey 
3/4 tsp. onion powder
1/4 tsp. oregano
1/4 tsp. marjoram
1/4 tsp. basil

If you like it hot, add 1/4 tsp. black pepper & 1/8 tsp. cayenne pepper.  Mix everything together in a bowl and spread over crust. 


PIE CRUST:
1 1/4 cup flour
1/4 tsp. salt
1/2 cup butter (chilled & diced)
1/4 cup cold water

Mix flour and salt together.  Using a pastry blender, incorporate butter until mixture is crumbly.  Add water, 1T at a time, until mixture forms a ball.  Wrap in plastic wrap and refrigerate for at least 4 hours.  Makes two 9-inch pie crusts.  Dough can be frozen.


in a large mixing bowl
6 cups raw oatmeal
1 cup coconut
1 cup chopped almonds or walnuts
1 cup sunflower seeds
1/2 cup sesame seeds
1/2 cup flax seeds

in a saucepan
3 tbsp cinnamon
1 cup honey or molasses
1/2 cup coconut (or other) oil
3 tbsp vanilla
1.5 cups raisins or dried fruit (optional and after baking; my family likes the fruit; I don't.)

Combine first 6 ingredients in a large bowl.  Mix together honey, oil, and vanilla in a small pan on low heat.  Pour combined honey mixture over dry mixture.  Stir until thoroughly mixed.  Put in oblong cake pans (my double batch needs 4 pans) and bake at 350, stirring every 7 minutes to give even browning.  Add 1 1/2 cup dried fruit or raisins (optional).  Store in tightly covered container.  Makes 12 cups.

02/2012 Update: We continue to create, modify, and devour our granola for daily breakfasts.


HOMEMADE CHEESE-ITS:
(My personal note: I modified my first batch by adding a tablespoon of Italian seasoning, using garbonzo flour, and pepper jack cheese.)  


10/2011 Update: We are passing on the cheese-its.  My final product just doesn't compare to the boxed treats my husband loves.

Thursday, January 6, 2011

homemade products

Dear Hannah,

I have learned so much from No Impact Man and keep attempting to apply it to our lives.  Your papa says he is the No Impact Man and that it is the rest of his family with all the waste.  Doesn't he do our shopping?  Well, Colin Beavan's book and film have brought much environmental conversation and activity into our home.  Your papa asked me never to turn off his water cooler again, but hasn't yet mentioned my constantly unplugging his appliances.  He even asked you to turn off the lights and water, doesn't mind you cosleeping with him without a diaper, and bought a used work chair off craigslist.com.  We are all making progress.  In an attempt to buy fewer plastic goods, I am searching for a laundry detergent recipe using borax and haven't yet found it.  We use a green detergent, but I'd like to end our use of all those plastic tubs.

In my hunt, I have found Colin Beavan's recipes for other home products.  Perhaps we'll be able to integrate some of them into our repertoire.  What will your poor shampoo-loving papa think now?  The following recipes are Colin's from the above link.

Household cleanser—One quart water, 1 teaspoon borax, 2 tablespoons vinegar, 1 teaspoon castile soap (you can see my supplies will last until I’m about 76 and it’s way cheaper than store bought).

Soap—You can use castile soap but we’re using soap made from local beeswax and bought at the farmers' market.

Shampoo—Seven ounces of filtered water, one ounce castile soap, one teaspoon olive oil. [Since writing this post, I've decided I'm not a great fan of this recipe. I now use baking soda mixed with water. It doesn't suds but it cleans really well. NIM 6/28/07]

Dishwashing detergent—one measure castile soap to one measure water.


Of course, if you can’t be bothered to mix this stuff up, just go to your local health food store and buy the eco-products that are explicitly labeled “nontoxic” (an FDA term) and biodegradable, are plant rather than petroleum based (I avoid animal based products too), and contain no chlorine bleach, benzyne, toluene, xylene, trichlorethane or phosphates. Buy them concentrated and large to avoid extra plastic packaging.

Still searching (for detergent),
your mama


healthy decomposable cleaners

a homemade drawstring bag